
Getting an AI transcript using Microsoft Word is as easy if not easier than using YouTube or AI transcription sites such as Otter.ai, so I think this is going to be a very short blog post.
So let’s get down to it. Firstly, you need to have an Office 365 account. I bought my current version, but before that, I received a free copy when I was a part-time student at UNISA. I think Microsoft provides these for most universities – full-time and part-time students. Once you’ve signed up O365, go to Office.com. Then navigate to Word. This transcription feature is not yet available on the desktop version of Word 365. Click on New Blank Document.
Once you have a new blank document, look for the light blue microphone on the menu bar. Click on the down arrow next to it. You will see two options. 1. Dictate and 2. Transcribe.

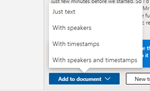
Click on Transcribe. Choose the language you wish to transcribe. For South Africans, the only choice is one of the English variants. So no Afrikaans, Xhosa, Zulu, etc. And then click on Upload Audio to upload your audio file. Then wait until the transcription is done. It only takes a few minutes. Once it’s done, click on the arrow next to Add to Document. Then choose between saving only the text, text and timestamps, etc.
And that’s basically how you generate an AI transcript using Word in Office 365. Easy-peasy until it gives you a frowning face and no transcript. But that’s a story for another day.
Learn more about changing the speaker names and some other features of the Microsoft Word automated transcription software here.